
In January a friend of mine sent mea blog post about “liberating” your art. In this case she was talking about digital photographs that we take but never print. It was a thought provoking read. You can see it at https://prairiesage.blog/2017/01/11/free-your-art/
In the post she alerted me to a project.
“It’s called ‘Liberate Your Art Postcard Swap’ and is organized and created by artist, Kat Sloma, of Kat Eye Studio
http://kateyestudio.com/The idea is to print and share your art with other artists by mailing 5 postcards (with your art printed on one side) to Kat before March 18, 2017. She then ‘swaps’ all the postcards around and sends them off all over the world so they can arrive in the mailboxes of all the artists who participated.”
The tough part for me was choosing just a few pictures. I thought I would try it but then I decided not to. Then I decided to try it but didn’t get around to picking out pictures and making postcards. So I decided NOT to do it. Then, as time was running out I decided to go for it. I chose these pictures:


and ordered postcards from Zazzle.
Kat sends out very good instructions for getting everything together and sending it off. I made the deadline with plenty of time to spare.
I thought it was pretty exciting. I received five postcards over a period of about a week. I notified each artist by email and also posted a picture of their art on Facebook and Instagram.
I kept waiting hear where my 6 cards had landed but by April 15th I had only heard about two of them. I got nice emails from two people. Never was aware that anything was posted on Facebook or Instagram. There was a lot of activity on the Facebook Event Page. Posts needed to be approved though so that kind of slowed things down a bit.
Here are the postcards I received


I had expected more photography but learned that a lot of other art is the norm.
So, it was fun and interesting. Kind of disappointing to only hear about two of my five cards.
Kudos to Kat for all the hard work.
Well, It’s been a long time since I wrote for my photo blog. So many changes – I don’t know where to start.
I’d previously written that the Samsung Galaxy SIII was the first cell phone camera that I liked. In the fall of 2014 I moved up to a Galaxy S5 and the camera was even better. It sported a whopping 16 megapixel camera. Although I continued to be primarily a DSLR shooter I shot a lot of pictures with that cell phone. The standard camera was the one I used the most but I tried several of the other ones. A Better Camera ended up as one that I used a fair amount.
We’re not huge Facebook, Instagram or Twitter users but I do like to put a few pictures out there. Lots of times even though I was mainly shooting with the DSLR we would take a cell phone picture just so we could post it to social media while we’re stil out and about.
The next technology advance was an Eyefi card from http://www.eyefi.com/. This SD card goes in my Canon camera and has a wifi transmitter built-in. This is a pretty amazing product that allows you to transmit pictures from your regular camera to your computer and/or their eye-fi cloud service and or your smart phone. This eliminated the need to shoot separate cell phone pictures for posting to social media. If you had the shot you wanted you could just send it to your cell phone and post it from there. We also used this capability to send pictures via messaging to family and friends.
Last year for my birthday my wife got me a Canon T6s. 
This is one heck of a camera. It produces 24 megapixel images and incorporates a lot of advanced technology from Canon. Focusing and exposure are both outstanding. A big deal for Canon was the addition of wireless capability. I can connect this camera to my cell phone and either shoot pictures remotely or transfer pictures from the camera to my phone. I do this all the time so I can post pictures or send them from the phone. Alternatively you can set the camera up to send pictures directly to Flickr, Google Drive, Canon, Facebook, Twitter or YouTube. You can also set up email lists so that you can choose one of those to email your photos. All of this requires access to a wifi network but it’s pretty impressive. The manual claims that you can easily transfer pictures from the camera to your cell phone using NFC (just touching them together) but I’ve never been able to get it to work.
This last Christmas I got a Canon EF-S 24mm f/2.8 STM Lens and I like it a lot. I write about that in a future blog.
Less than 3 weeks ago I upgraded to a Galaxy S7 Edge. Oddly Samsung reduced the total pixels from 16 million to 12 million but they still made the camera better. Although I’ve only been shooting with it for a little while I am quite impressed. It takes much better pictures in low light than previous cameras and that was always a sticking point for cell phones. This camera also lets you shoot in “Pro” mode with control over ISO, white balance, shutter speed and so on. Lots of other features too. I’ll do a compete blog on the camera in the near future. Here are a few sample pictures.


This morning I got an email from eye-fi, the company that produces wifi enabled sd cards for your camera. They announced the Freestyle – “the world’s first portable, all-in-one smart drive”. This is huge!!!!
I’ve been waiting 18 years for someone to invent/produce this. I’ll let you read the details here
http://www.eyefi.com/lp/freestyle
but the essence is that you can put your camera cards into this thing and have the photos transferred to the built-in 1 TB hard drive. It will also transfer your photos to one of three cloud storage places (including Amazon).
Now this would be a good deal for $200 and that’s the official price.
However, until February 7th you can pre-order for $125 and they will throw in a $99 Mobi-Pro card. I have one of these and it’s great.
Even though I now have a camera with built-in wireless I find that the eye-fi card gives me additional options. You might not want to spend $99 for one if your camera already supports wireless but you definitely want one since it’s essentially free.
Check this out. You’ll be glad you did. Post comments with reactions, questions and let us know if your ordered.
For many years the program has not been updated. Now out of the blue comes a fantastic new version with auto completion and a whole new interface.
Check it out http://research.microsoft.com/en-us/um/redmond/projects/ice/
As I wrote last week I’m now happy to have a cell phone camera as another tool. Generally when I’m out to create serious photographs I’m still going to use my DSLR. But you can sure have a lot of fun with a cell phone camera.

")


A few years ago I wrote about converting a photo to a painting
https://arthillphoto.wordpress.com/2011/02/27/making-a-photo-look-like-a-painting/
Unfortunately the link I provided in that article no longer works. But not to worry – you can often find an old out-dated web page by going to webarchive.org (which I did)
Since that time photo editing programs have gotten better at producing watercolor and oil painting renditions of your photos. But they still don’t look so good and don’t give you very many options.
I recently picked up a Topaz filter called Simplify and it’s pretty good at converting your photo. There are lots of presets and they have decent tutorials to help you explore the product on your own.
Here are some of the things I’ve produced

from this

This

from this

and these

When I first started seeing HDR photos a few years back I disliked them. It seemed that most HDR aficionados were guilty of either
1. Posting ALL pictures as HDR even when a regular version would have been wonderful
OR
2. Overdoing HDR so that every picture had that garish, over processed look
When I first tried HDR myself I wasn’t happy with the results so I just didn’t go any further with it. Then I started seeing a few HDR pictures on smugmug and flickr that looked great – not over processed. In fact, you couldn’t tell it was HDR. I then read a bunch or posts about HDR at http://edknepleyphoto.com/ and learned that HDR can be a valuable tool if you don’t overdo it and overuse it. So I’ve done some HDR myself over the years and had pretty good luck with it. I use PhotoMatrix Pro.
Here are some examples of stuff I have done.


I don’t use it very much. The trick has been to think about it so that I can take 3 shots to use to create the HDR. I just don’t remember very often or don’t notice that the scene I’m shooting might lend itself to HDR.
So I was pretty happy to learn that in the latest version of PhotoMatrix Pro they added a feature that will do an HDR image from ONE RAW image. I’m sure it’s not as good as using three images but it seems pretty good to me. I gave it this image as a RAW file

and produced this

My last few phones have had cameras. Four years ago I got a Sony Experion cell phone because it had an 8 megapixel camera. Not too many of the other cell phones had that at the time. I hated that camera. I don’t think I got 5 good pictures with it in the two years I owned it. Two years ago I got a Samsung Galaxy SIII; I’ve been pretty happy with that phone the whole time and I’ve taken a lot of good pictures with it. My daughter has a Galaxy S4 and the camera is even better. My other daughter has an iPhone and she has always had pretty good results. So, I’ve gone from thinking that cell phone cameras are almost worthless to thinking that they are pretty useful.
I don’t think that they are a replacement for a traditional camera. Let’s face it, that little dime size lens on your cell camera just can’t compete with that big heavy zoom on your DSLR. That brings me to one of the biggest drawbacks to my camera phone – no zoom. Sure it has a digital zoom but it’s not worth much. I’ve disabled digital zoom for years on my regular cameras. All it does is digitally grab the center of your picture. So I take 99% of my cell pictures without zooming in at all. But that’s okay; my first digital camera didn’t even have a zoom lens and I shot great stuff with it.
I have installed a few camera apps on my phone as alternatives to the built in one. For the most part I haven’t seen huge advantages to any of them. Smugmug has one; I never got used to it. Each has a few features that aren’t in the standard app so you might want to check out ProCapture and CameraZoomFX. One program that you should definitely get is Panorama (http://powercam.wondershare.com/panorama.html). Simple and great results. I’ve tried the panorama features in many others and this is the one you want. Available for Android or iPhone.
Another program you’ll want is snapseed. This is a cool photo editing program that came out for the iPhone and then came out for Android. It’s also available on Windows 8 but that’s costs $19.99 – the phone apps are free. I also have Aviary for editing phone photos. Aviary is also available for Windows 8 but I’m not crazy about that version. I recently discovered, quite by accident that Samsung has a photo editor. I was looking a picture in the standard gallery and brought up the menu. I chose Edit and got the message that I don’t have photo editor installed would I like to install it. I did and it works pretty good. ![]()
Lastly I’ll tell you about my experiences with some of the programs that automatically upload your cell phone pictures to the cloud. I’ve used OneDrive, Google Drive and Amazon Cloud. Any of them can be set up to auto upload and you can specify that it won’t happen unless your phone in connected to Wi-Fi. I’d suggest you set them all up and decide which one you like best. In Windows 8 each of these just appears as another folder in Windows Explorer. It’s really nice to be able to sit down at your computer and already have your cell phone pictures there.
It’s been three years since I stopped blogging here except for on post in November 2011. I’ve got the urge to get back to do this – maybe not frequently but we’ll see how it goes. I’m still using most of the tools I’ve written about but I’ve dabbled in HDR a bit with PhotoMatrix Pro. I’m running Photoshop Elements 11 and I’ve added the Perfect Suite which I use a little bit. I also have Three Topaz filters, Clarity, Simplify and Detail. I really haven’t found a use for Detail but Simplify is a great tool for creating painting like images and Clarity can add some punch to a lot of different kinds of photographs.
I’ll write some articles and put up some example of each of these. I’ve also changed my mind a bit about cell phone cameras since I got a Galaxy SIII two years ago. There are plenty of situations where a cell phone camera will get the job done. Still, you can’t beat a serious camera like the Canon T4i that I’m shooting with. Have you found yourself in situations where you want to get high quality pictures but you’d also like to post to Facebook or just send a photo to family and friends? Or, you’ve just taken a wonderful photo with your DSLR and now you wish you could send it out. Sometimes you can try the same shot with your cell phone camera but it’s tough to replicate your success with people pictures. You also probably don’t have the zoom range, etc. I recently acquired an Eye-Fi card for my DSLR. This looks and works pretty much like a regular SD storage card but it has wi-fi capability built-in. It’s pretty amazing. When I take a great picture that I want to post or send out right away I just let the camera transmit the picture to my cell phone and I send it from there. The full size pictures from my camera are too big to send quickly and certainly bigger than I would ever need for messaging or social media posting. Fortunately my camera has built-in resize function so I shrink the photo before transmitting it to my cell phone. I bought the Eye-Fi Pro-X2 because I thought it would be nice to be able to transfer pictures wirelessly to my computer as well as my phone. It turns out that you would never use that feature – it’s too slow. So I could have gotten the Eye-Fi Mobi card which would probably have been easier to set up and use.
Early digital cameras typically only gave you a choice of 50, 100, 200 and 400 for ISO. Pictures shot at 400 just weren’t very clean and crisp – they had a lot of noise. 50 or 100 gave the best results but weren’t practical in any conditions without LOTS of light. Modern digital cameras offer a choice of ISO from 100 all the way to 6400 or even higher. So which should you most often use? And what about Auto ISO where the camera chooses ISO for you?
You need to have some understanding of the relationship between ISO, shutter speed and aperture (aka f-stop or lens opening). If you need to brush up, read my post Shutter speed, f-stop and ISO.
It would be nice to just shoot everything at 100 ISO since that will give you the “cleanest” image with the least noise (noise is something like graininess in film). I’ve found that 100 ISO though often forces you to use too slow a shutter speed or too large an aperture. If you have a point and shoot camera I suggest you try 200 and also see how well your camera does 400 if light is dim.
With a recent DSLR you have a lot more choices. I typically start at 400 ISO and move up if I’m finding shutter speed too low. I usually shoot in AV or aperture priority mode so I set the aperture/f-stop that I want and check to see what shutter speed the camera chooses. I might go up to 800 ISO even with plenty of daylight if I’m shooting a soccer game or something else where I want pretty high shutter speeds.
Indoors without flash and relatively dim lighting (church, museum, etc.) I try 1600 and if it just won’t work, move to 3200. I rarely use 6400 but if there just isn’t much light at all that’s what I’ll do. I recently was outside around dusk and wanted to capture a picture of my neighbor’s red tree. Even at 6400 with the lens wide open I got a pretty show shutter speed. So I shot at 12,800 ISO. This was the result.
 So, if you need to don’t be afraid to bump your ISO as high as it can go to get a shot. Would this have been better on a tripod at ISO 100. Probably but this one is good enough for me.
Here’s another one inside the President’s performance at Disney World that I shot as ISO 12,800 because it was so dark in there.

And here’s one at the Magic Kingdom shot at 6400 ISO

So, if you need to, crank up that ISO. A lot of people are afraid to because of the dreaded noise but that just means that they hand hold at very slow shutter speeds and the resultant picture may not be sharp.
One of the nice things about shooting in AV (aperture priority) mode is that the camera will always give you a shutter speed that works. It may be too slow to handhold so you might need a tripod but it will pick a shutter speed for you. TV or shutter priority mode, on the other hand, has a built in problem. You pick a shutter speed and the camera tries to choose an appropriate lens opening. It may not be able to because the required f-stop is beyond what your camera will support. So you get the dreaded flashing f-stop as the camera tries to tell you this won’t work. You can keep bumping up the ISO a little bit at a time to see if you can get a usable f-stop with the shutter speed you have chosen. This may work fine for you at a soccer game on an overcast day.
But in certain situations you just can’t afford to keep fooling around with camera settings or you’ll miss the shot. If you’re shooting from a moving vehicle you may be going through a whole range of scenes with bright light and dim light. I was recently confronted with just this problem on a train in Switzerland. I wanted to set a high shutter speed so that my pictures from the train wouldn’t be blurry. But the scenes outside were going to be changing rapidly from snow scenes to dark forests and everything in between. If I kept trying to change the ISO to get a usable f-stop I would miss a lot of shots.
The solution was to set the camera to Auto ISO. I set the shutter speed to 1/1000th (in shutter priority mode) and let the camera choose the f-stop. If the camera can’t do the job at a low ISO it will pick a higher one until the combination works.
Here’s the first shot from the moving train 1/1000th sec, f5.6, ISO 100

Here’s one at 1/1000th sec, f4.0, ISO 1600

And finally one at 1/1000th sec, f9, ISO 100
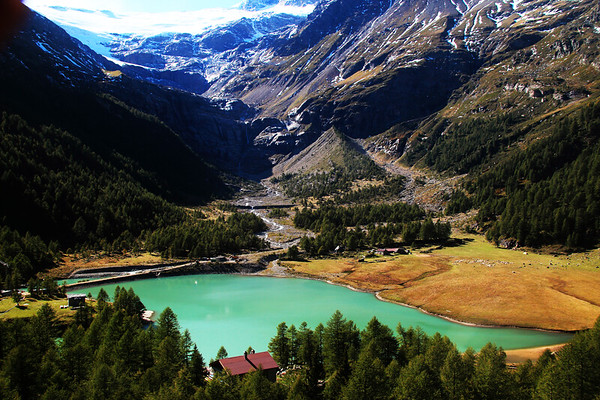
On my camera, a Canon T3i, there is a menu setting for Auto ISO that lets me restrict how high the camera will go. I set this to ISO 1600 but could have set it as high as 6400 if I had expected low light conditions.
